Heroku Restore Database From Another App
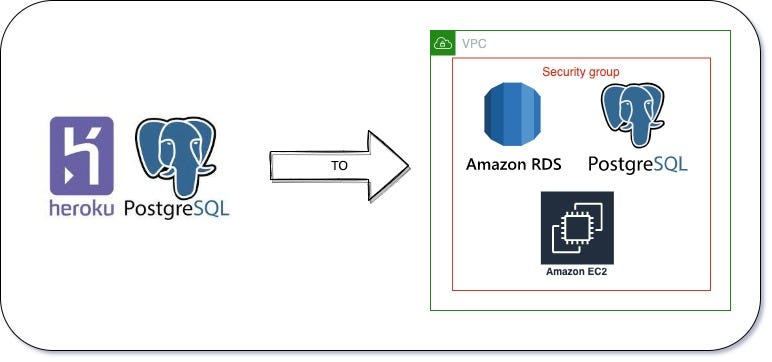
Migrating From Heroku Postgres to Amazon RDS
Complete Step by Step guide of how to migrate large PostgresSQL Database from Heroku to RDS
![]()
First, the background, what are the differences between Heroku Postgres Database and Amazon RDS for PostgreSQL, and why even bother migrating.
Everyone that has used Heroku knows the simplicity and ease of use of its Add-o n s. They let you get started with a database, log monitoring, or a dozen other helpful services in minutes. It is the perfect combination to get things off the ground and running, or just eliminate the overhead of managing external services. The question is when is using Heroku Add-ons not appropriate and when is it the time to switch to a service that you have more granular control over.
On high-level Heroku Postgres Database and Amazon RDS for PostgreSQL, are both scalable on-demand Postgresql Databases.
The differences are visible when we focus on details in control, extensibility, and ecosystem. Heroku Postgres Add-on provides general "Levels" on which you can base your need. With RDS you have much more granular control over the instance type (memory, CPU, capacity), parameters configuration, redundancy levels, and cost.
Just some examples:
- Cost Savings: If you think that you will use the same type of DB for at least a year, RDS has the option to purchase a Dedicated Instance. That will immediately cut your cost by half.
- Configuration Flexibility: With RDS you can control configurations and DB management, coming with the same (if not better) guarantees of uptime, cost, and monitoring.
- There is also the option to choose different types of Replication instance types, wherewith Heroku needs to be the same type as the Primary Database.
Ok. You have been with Heroku Postgres for a while and now have decided to migrate to RDS.
When you are dealing with a very big database — tens to hundreds of GBs, migration can be quite a challenging task. You are thinking, how can I perform a migration with the lowest downtime, and keeping existing security in place. To help with that I have broken down the migration plan into 3 parts: Security Considerations, Migration Optimizations & Speed, and Migration Steps.
1. Security Considerations
In the AWS ecosystem, you control access via VPNs and VPN Security Groups.
When connecting Heroku App to RDS Instance you will need to use a public URL and possibly IP Restriction. In general, you want to avoid using a public URL for database connection if you are working within AWS, but in this case, it can be the only choice. So, how can we improve the security:
- Restrict Postgresql Connection to a private IP from Heroku
This option is ONLY POSSIBLE if you have Heroku Private Spaces or you buy a dedicated IP Add On (those are most commonly pay per request/bandwidth). Both of those options might get very expensive and wipe out the cost savings of moving to RDS. - Restrict RDS inbound traffic with Security Group
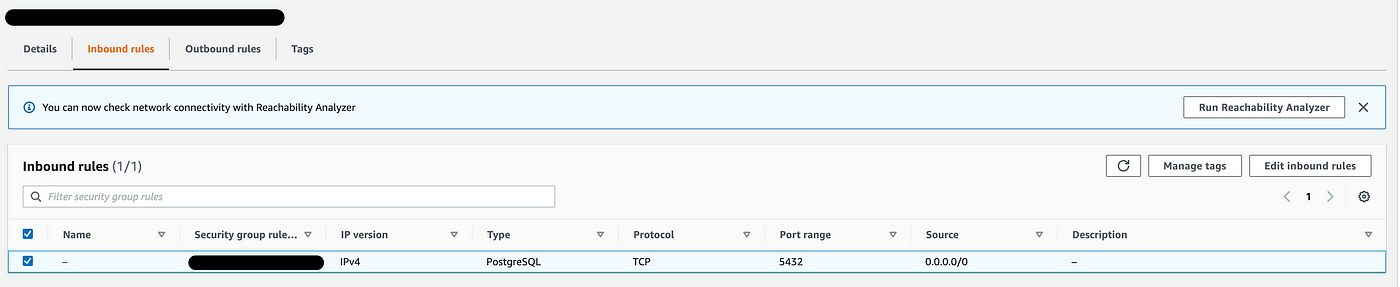
Regardless if you have private IP or not, you should restrict Inbound connections to your RDS instance to PostgreSQL TCP traffic.
In general use0.0.0.0/0or your private IP if applicable
- In AWS: Enforced Instance SSL connection on RDS Instance -
a) Change the default configuration of the RDS Instance Parameter group in use to enforce SSL. You will need to change the parameterrds.enforce_ssl = 1.
My recommendation will be to duplicate the default parameter group and work with a new modified one.
b) Download the SSL Certificate for the region in which your RDS Instance is. At the time of writing, you can download it from this page — https://docs.aws.amazon.com/AmazonRDS/latest/UserGuide/UsingWithRDS.SSL.html#UsingWithRDS.SSL.RegionCertificates

- On Heroku: Connect to the new RDS Instance using SSL Certificate -
a) Save the RDS SSL certificate in your app and push it to Heroku
b) Reference the certificate in theDATABASE_URL. It's simple as adding a URL query paramsslcato the connection URL asDATABASE_URL=postgres://username:password@hoistname/dbname?sslca=config/amazon-rds-ca-cert.pemgiven that you saved the certificate atconfig/amazon-rds-ca-cert.pemin your project
2. Migration Optimizations & Speed
Use EC2 instance instead of the local machine / on-premise machine to perform the whole migration. In most cases, you will just need a very low-tier instance where only the attached storage might have to be bigger, depending on your backup size. You would perform the following steps on there: download the Heroku Postgres backup and Restore the backup using parallel jobs (Outline in the Migration Process & Plan). If you are dealing with a very large database backup, this will give you exponentially increase the download speed of the backup and pg_restore command. Additionally, you will be working within your AWS VPC which makes things more secure. You will avoid very likely timeout issues from your local machine.
In the EC2 Instance, you might have to install postgres which also installs pg_restore
EC2 Tip for Mac Users: Add the line
ServerAliveInterval 20to your~/.ssh/configfile before connecting to the EC2 instance in order to keep your terminal session alive.
Do not use browser console session for connecting and executing the steps. It will time out.
3. Migration Process & Plan:
Phase I:
- Put Heroku app into maintenance mode
heroku maintanance:on -a {app-name} - Scale down / turn off all background job dynos
- Monitor the Heroku app for any activities and anything that you might have missed.
- Monitor your app for any traffic
Phase II:
- Start Heroku Database Backup
heroku pg:backups:capture -a {app-name} - When the latest backup is ready you need to download it. It will have a name like
b03
- List the Public URL of the backup
heroku pg:backups public-url {backup-name} --app {app-name} - Start downloading the backup into a file
my-backup.dump.
Ideally on EC2 Instance.
curl -o my-backup.dump "{public-url}"
* Do not forget to have double quotes around thepublic-url
3. Import the DB dump to the new RDS database instance.
Ideally using EC2 Instance
pg_restore --verbose --clean --no-acl --no-owner -h {rds-instance-url} -U {db-user} -d {db-name} --jobs={number-of-jobs} {my-backup.dump}
The PRO tip here is to use the option
--jobsfor number-of-jobs. That will run the restore in parallel using multiple threads and make the process exponentially faster. More info here: https://www.postgresql.org/docs/9.2/app-pgrestore.html
4. Step 5 (Optional): Connect to the DB with GUI or command line and do a sanity check. Compare the size of some tables and if indexes are created. (My favorite free GUI for PSQL is Beekeeper Studio)
5. FINAL STEP / IRREVERSIBLE — change the DAATABASE_URL in the Heroku App config. This step is irreversible since you will have to delete the Heroku Postgresql Add-on which will kill the current database. It is an unfortunate process. See my opinion about that in the "Final Food for Thought" section.
Change DATABASE_URL to your AWS RDS URL.
DATABASE_URL=postgres://username:password@hostname/dbname?sslca=config/amazon-rds-ca-cert.pem

6. Enable all Background Job Dynos
7. Remove the app from Maintenance Mode.
heroku maintanance:off -a {app-name}
Final Food for Thought
- Heroku Postgres Add-on relies on being attached to a Heroku App.
It can not be used on its own. That is a problem because changingDATABASE_URLis not possible when the HEROKU Postgres Add-on is active. The Add-on needs to be deleted in order to changeDATABASE_URL. Copying the DB to another app is not exactly an option and/or acts like a whole newpg_restore. If changing theDATABASE_URLwithout removing the Postgres Add-on was possible, it would have been ideal for a backtrack situation when you need to go back to your previous Heroku Database. - Perform few Dry Runs:
Execute the whole process without changing the actualDATABASE_URL( skipping Migration Phase II, Step 5). By doing so, you can outline the migration in your migration notes. That will also help you determine several things:
- The overall time it takes to finish the migration — therefore you can plan for a scheduled maintenance window.
- Anything you missed in the process.
- Monitor the EC2 instance metrics and RDS Metrics.
In most cases, CPU Freeable memory will be most impacted. The more jobs in the option--jobsyou use inpg_restore, the more CPU will be affected. Though there is a point that more jobs will not finish the migration faster. Most likely some jobs (that work on the bigger tables) will take as much as everything else and the whole migration will be reliant on them to finish.
3. AWS Server Migration Service
My First Instinct of doing Heroku to RDS database migration was, let's use AWS Server Migration Service. That kinda tool will give me 99.9% uptime during the migration until the time of DATABASE_URL change. , I found out the hard way (after I set up everything) that Service Migration Services relies on Logical Replication that cannot be configured with the Heroku Postgres database as the Source. More info on AWS MIgration Services and Postgresql migration — https://aws.amazon.com/blogs/database/migrating-postgresql-from-on-premises-or-amazon-ec2-to-amazon-rds-using-logical-replication/
4. Helpful AWS Tips for loading data into a PostgreSQL DB instance here. Some of them make a lot of sense, yet for my migration, they did not make much of a difference and it will increase the whole migration process as you will have to apply those changes to the RDS Instance and then revert them once you are done with the migration. It would be ideal to experiment with some of those in your Dry Runs.
Heroku Restore Database From Another App
Source: https://towardsdatascience.com/migrating-from-heroku-postgres-to-amazon-rds-2e738e7730e5
0 Response to "Heroku Restore Database From Another App"
Post a Comment